안녕하세요, hr0513 입니다! 🥰
SQLite는 로컬 환경에서 유용하지만, 배포까지 고려한다면
Heroku Postgresa와 같은 데이터베이스를 사용하는 것이 좋습니다.
아래는 SQLite를 설정하고 사용하는 방법입니다.
1. SQLite 다운로드 페이지
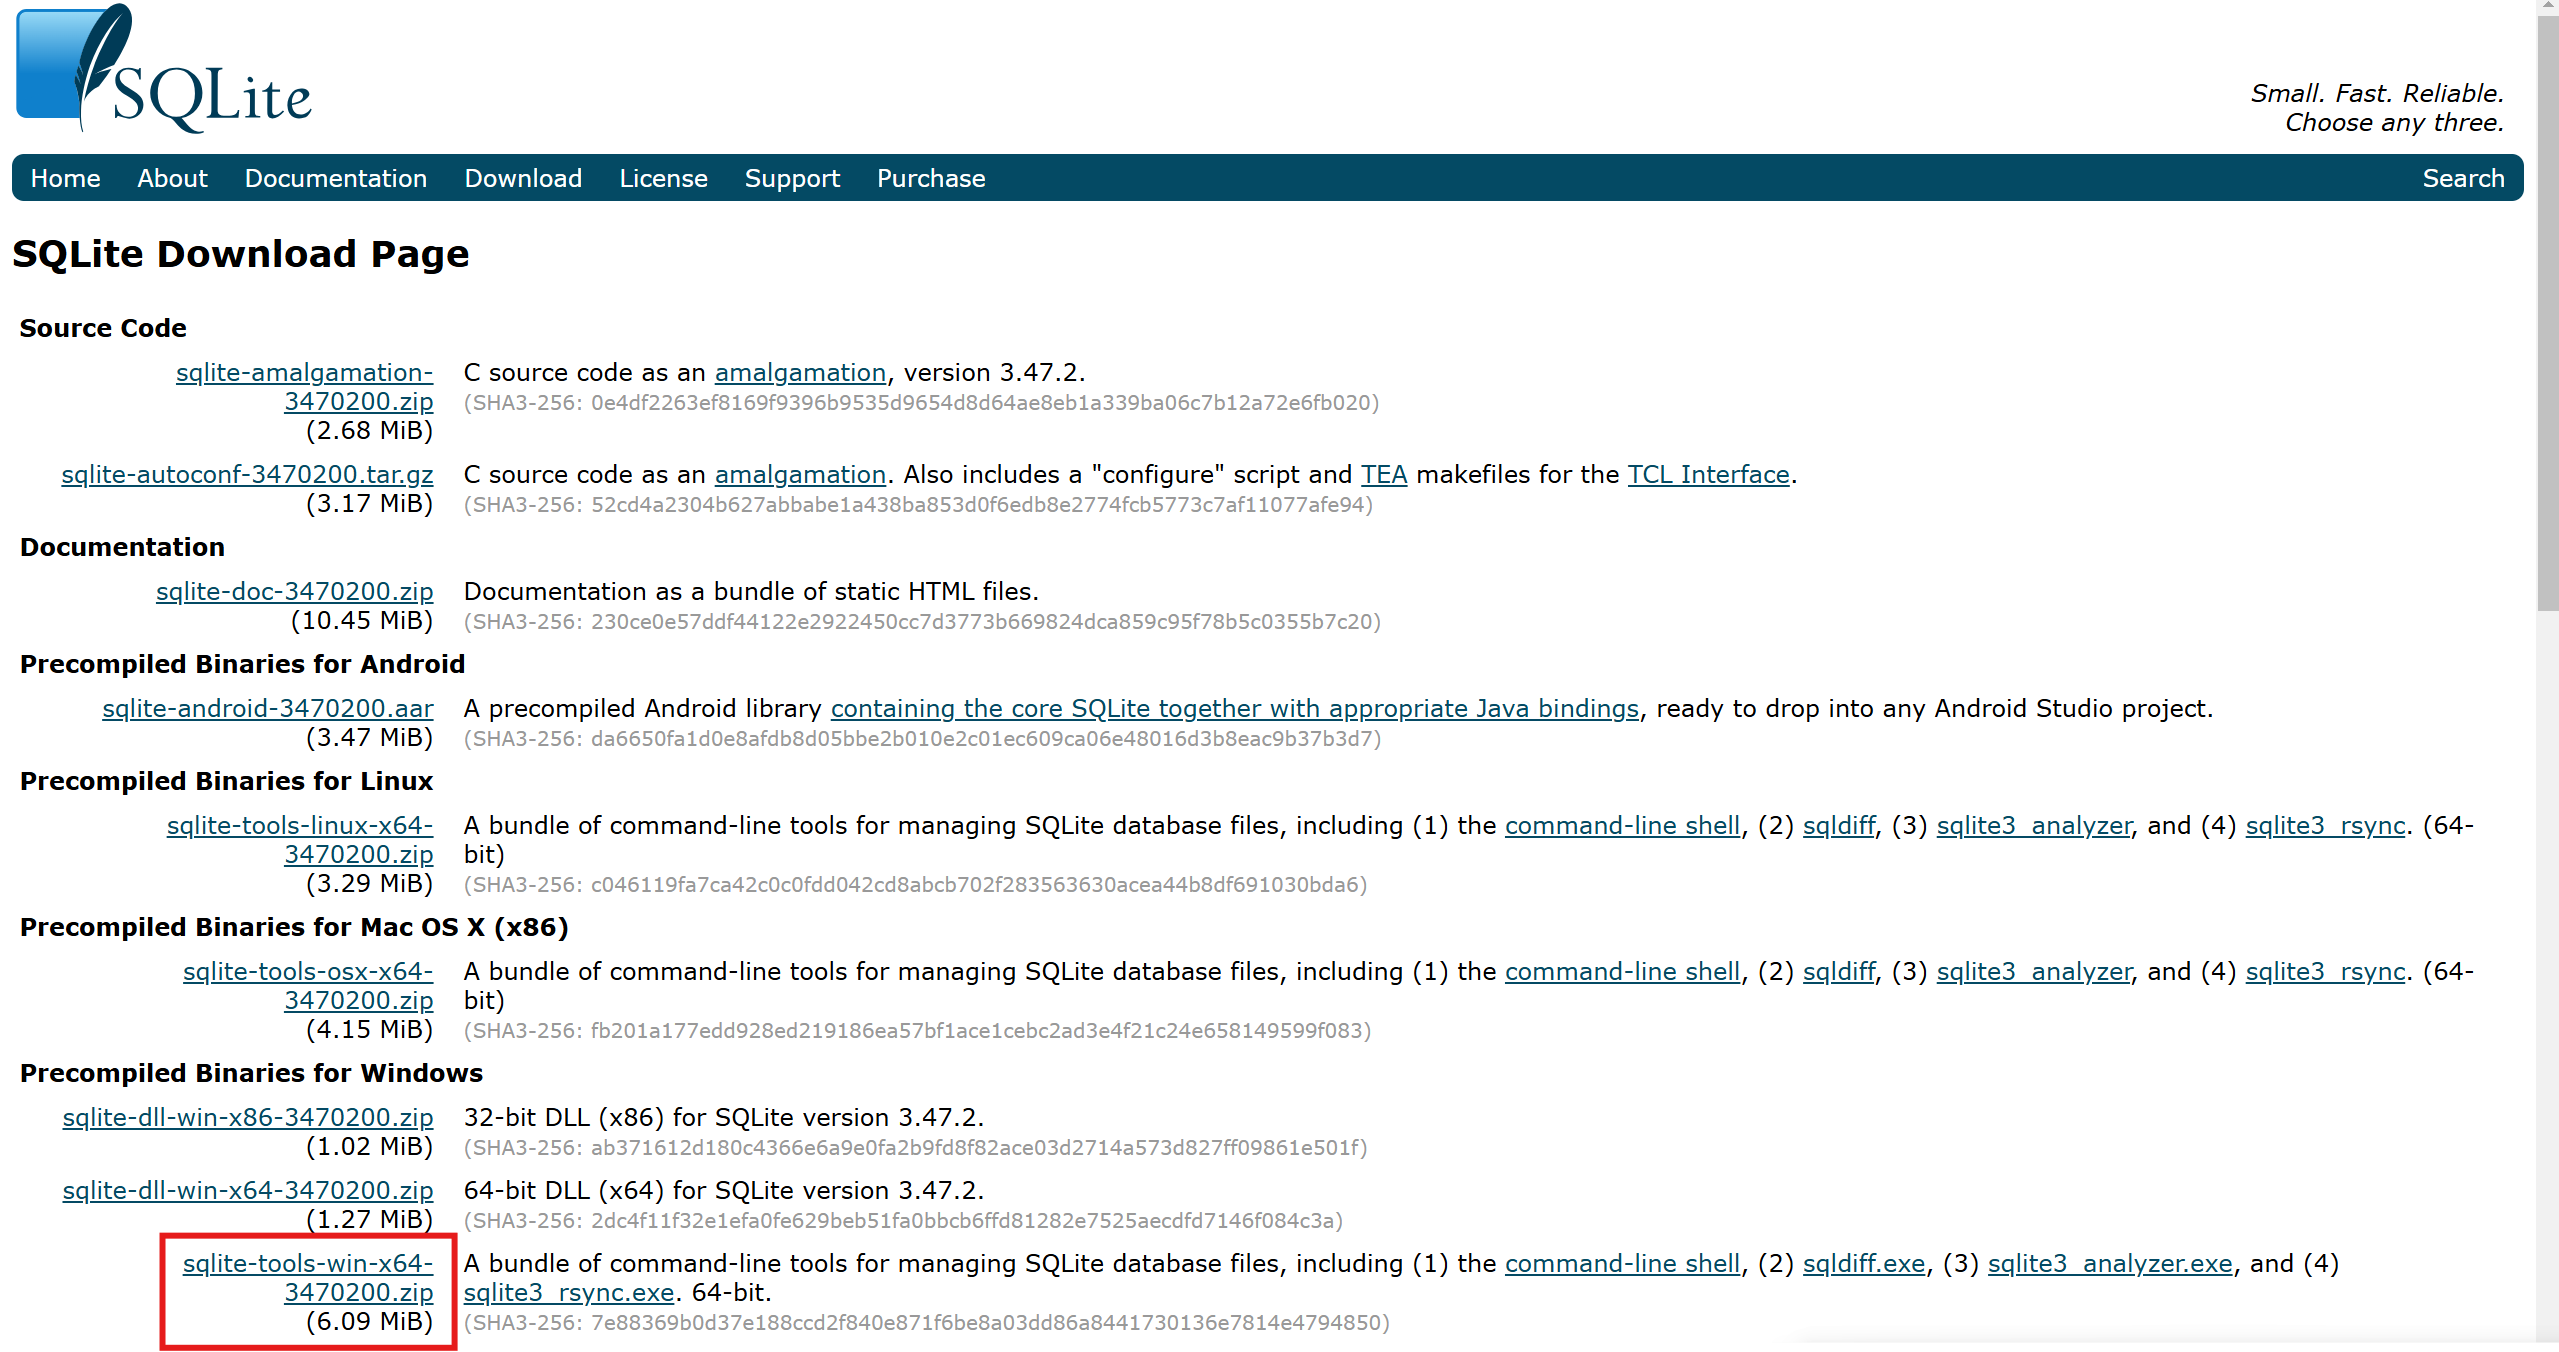
SQLite 다운로드 페이지에 접속합니다.
https://www.sqlite.org/download.html
SQLite Download Page
Templates (1) and (2) are used for source-code products. Template (1) is used for generic source-code products and templates (2) is used for source-code products that are generally only useful on unix-like platforms. Template (3) is used for precompiled bi
www.sqlite.org
SQLite 다운로드 페이지에서 sqlite-tools-win-x64-3470200.zip 파일을 다운로드합니다.
2. SQLite 설치
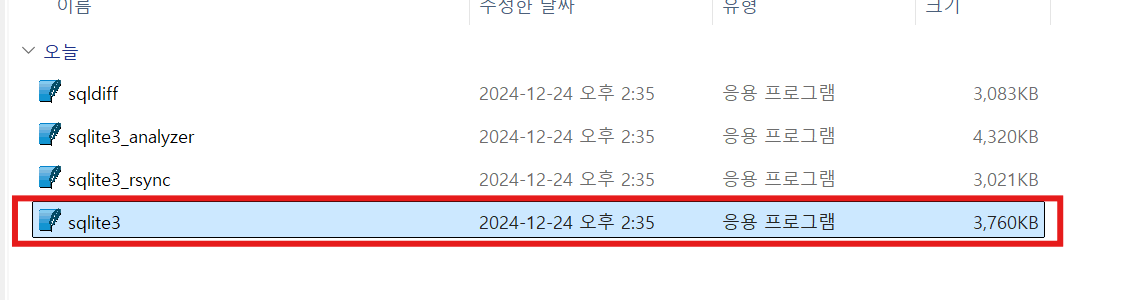
1. C:\sqlite 폴더를 만들고, sqlite3.exe를 해당 폴더에 넣습니다.
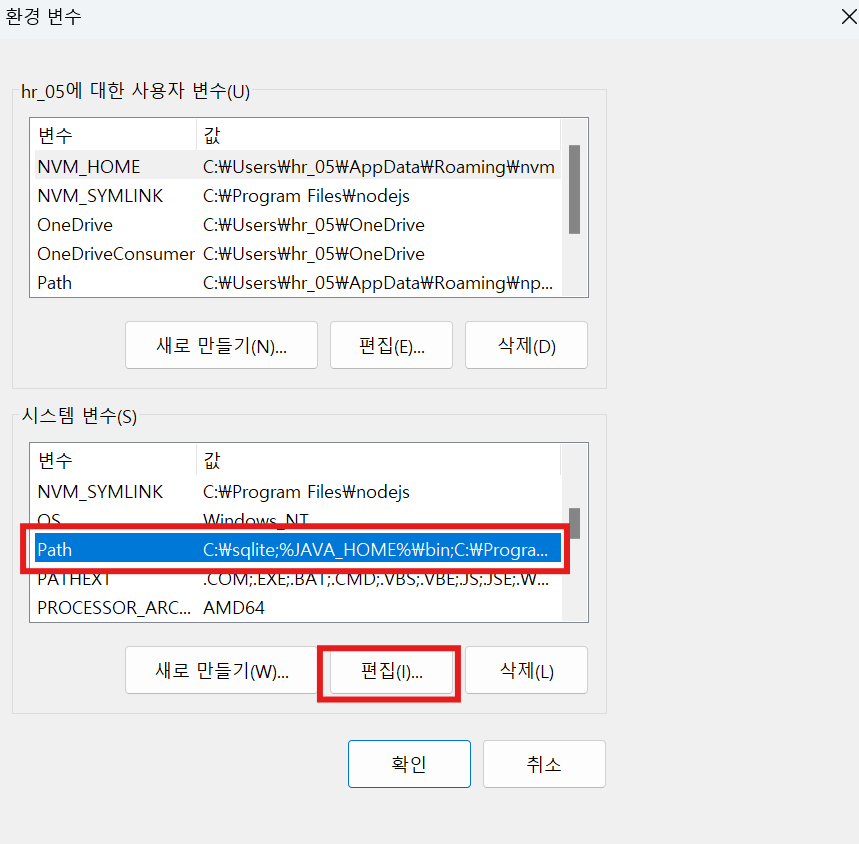
2. 시스템 환경변수 편집에서 환경변수 > Path를 클릭하고 새로 만들기를 클릭하여 C:\sqlite를 추가합니다.

3. vscode를 끄고 다시 켜주세요.
3. 터미널에서 SQLite 버전 확인
터미널에서 sqlite3 --version 명령어로 SQLite가 정상적으로 설치되었는지 확인합니다.
sqlite3 --version4. 터미널에서 SQLite3 DB 만들기
4-1. SQLite3 데이터베이스 열기
터미널에서 sqlite3를 실행하여 데이터베이스를 엽니다.
예를 들어, market.db라는 데이터베이스를 생성 및 오픈하려면 아래 명령어를 입력합니다.
sqlite3 market.db
4-2. 테이블 생성
CREATE TABLE 명령어를 사용하여 테이블을 만듭니다.
예를 들어, products 라는 테이블을 만들고, 상품 ID, 이름, 가격, 설명 등의 컬럼을 추가할 수 있습니다.
CREATE TABLE products (
    productId INTEGER PRIMARY KEY AUTOINCREMENT,
    productName TEXT NOT NULL,
    productPrice TEXT NOT NULL,
    productArrivalInfo TEXT NOT NULL,
    thumbnail TEXT
);
4-3. 테이블 생성 확인
테이블이 제대로 생성되었는지 확인하려면 다음 명령어로 생성된 테이블을 확인할 수 있습니다.
.tables
4-4. 데이터 삽입
테이블이 만들어지면, INSERT INTO 명령어로 데이터를 추가합니다.
INSERT INTO products (productName, productPrice, productArrivalInfo, thumbnail)
VALUES ('고양이 전용 밥', '7,850원', '내일(수) 도착 보장', 'path/to/image.jpg');
4-5. 데이터 확인
테이블에 데이터가 잘 삽입되었는지 확인하려면 SELECT 명령어를 사용합니다.
SELECT * FROM products;
4-6. 종료
작업이 끝나면 .exit 명령어로 SQLite3 콘솔을 종료합니다.
.exitNode.js에서 SQLite 설정
1. 필요한 패키지를 설치합니다.
yarn add express sqlite3 cors
2. server.js 파일을 작성하여 SQLite를 설정합니다.
const express = require('express');
const sqlite3 = require('sqlite3').verbose();
const cors = require('cors');

const app = express();
const PORT = 5000;

// Middleware
app.use(cors());
app.use(express.json());

// SQLite 데이터베이스 연결
const db = new sqlite3.Database('./market.db', (err) => {
  if (err) {
    console.error('Database connection failed:', err.message);
  } else {
    console.log('Connected to SQLite database.');
  }
});

// 상품 목록 가져오기 API
app.get('/products', (req, res) => {
  const sql = 'SELECT * FROM products';
  db.all(sql, [], (err, rows) => {
    if (err) {
      res.status(500).json({ error: err.message });
      return;
    }
    res.json(rows);
  });
});

// 서버 실행
app.listen(PORT, () => {
  console.log(`Server is running on http://localhost:${PORT}`);
});
3. 서버를 실행합니다.
node server.jsReact에서 데이터 불러오기
1. react-query 설치
yarn add react-query
2. index.js
import React from 'react';
import ReactDOM from 'react-dom/client';
import './index.css';
import App from './App';
import reportWebVitals from './reportWebVitals';
import { QueryClient, QueryClientProvider } from 'react-query';

// QueryClient 생성
const queryClient = new QueryClient();

const root = ReactDOM.createRoot(document.getElementById('root'));
root.render(
  <React.StrictMode>
    <QueryClientProvider client={queryClient}>
      <App />
    </QueryClientProvider>
  </React.StrictMode>
);

reportWebVitals();
3. Product.js
import React from "react";
import styled from "styled-components";
import { useQuery } from 'react-query';

const fetchProducts = async () => {
  const response = await fetch('http://localhost:5000/products');
  if (!response.ok) {
    throw new Error('Network response was not ok');
  }
  return response.json();
};

const ProductWrapper = styled.div``;

const Product = () => {
  const { data, isLoading, error } = useQuery('products', fetchProducts);

  if (isLoading) return <div>Loading...</div>;
  if (error) return <div>Error: {error.message}</div>;

  const productDataArray = [
  return (
    <ProductWrapper>
     {data.map((product) => (
        <div key={product.productId}>
          {product.productName} - {product.productPrice}
        </div>
      ))}
    </ProductWrapper>
  );
};

export default Product;
다시 한 번 더 말씀드리지만...
SQLite는 로컬 개발에 유용하지만, 배포를 고려한 프로젝트에는 Heroku Postgres와 같은 클라우드 데이터베이스를 추천합니다.
저처럼 배포하실 분은 괜히... SQLite 연동하는 곳에 시간 쓰지 마세욤..

'개발 > node.js' 카테고리의 다른 글
| Heroku 계정 생성 및 CLI 설치 (2) | 2024.12.24 |
|---|